Okay
so I know Australia Day isn't for another week and a half, but I'm
attempting to be a good planner/organiser this year and trying not to
leave things to the very last minute. Plus as soon as I decided I wanted
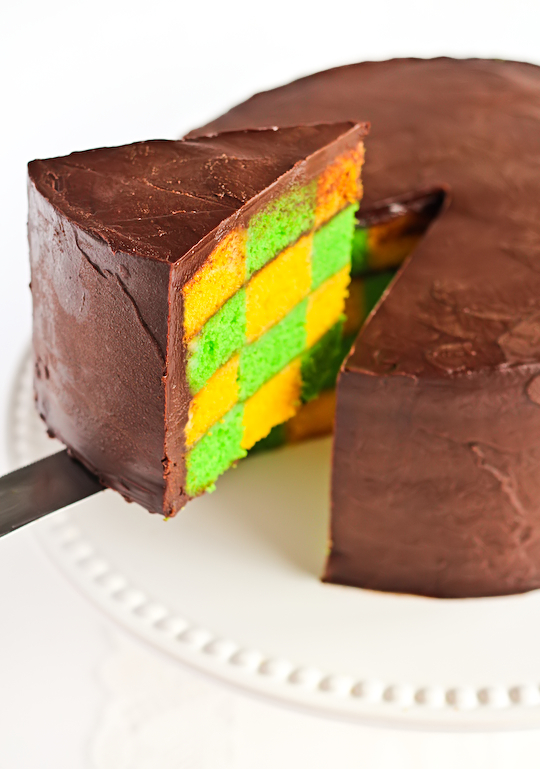
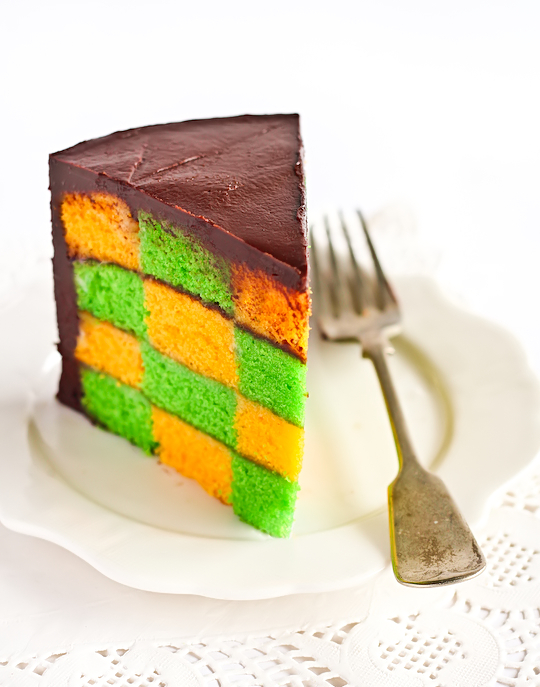
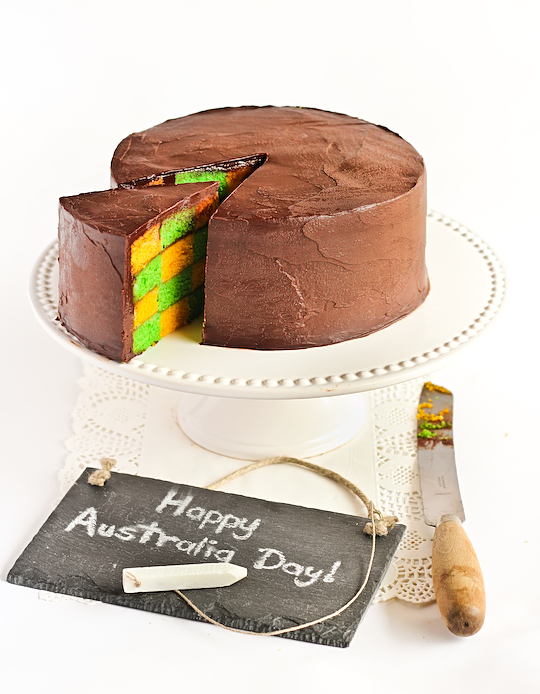
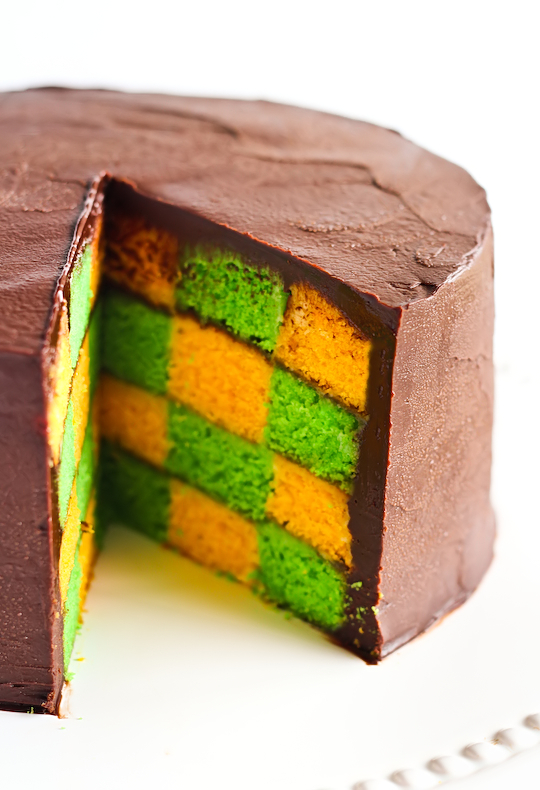
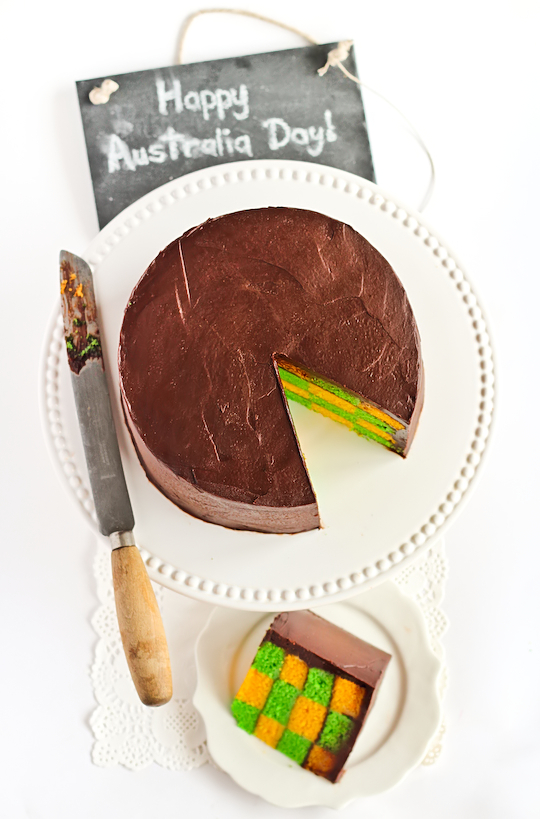
to make this crazy Green & Gold Checkboard Cake covered in
Chocolate Milo Ganache for Australia Day, I knew I better give myself an
extra weekend buffer just in case I completely effed it up on my first
attempt. This cake took a bit of planning and had a lot of potential to
go horribly wrong. But YAY for me, it turned out pretty good! As someone
who was born in Australia and has spent the majority of my life in this
country, it's important to me to have recipes on the blog that
celebrate being Australian. In that same spirit you could also try my
Arnott's inspired
Tim Tam Cake,
Mint Slice Cake or
Iced Vovo Cake for any Australia Day BBQs you might have planned.
I've
always wanted to try making a checkerboard cake, ever since seeing
instructions for it in my Le Cordon Bleu book. It's usually done with
vanilla and chocolate flavours, and to get that lovely checkerboard
effect when you cut into the cake you need to create alternating layers
with the two flavours so that each layer looks like a bullseye/the
Target logo. It looked like a lot of work, especially since that recipe
involved piping concentric circles of cake batter. A lot of recipes on
the internet instruct you to use a special pan that has these circular
plastic dividers so that you can bake your layers with two alternating
colours, but personally that felt a bit like cheating and I don't like
buying a whole new pan for one specific purpose. So I decided to do it
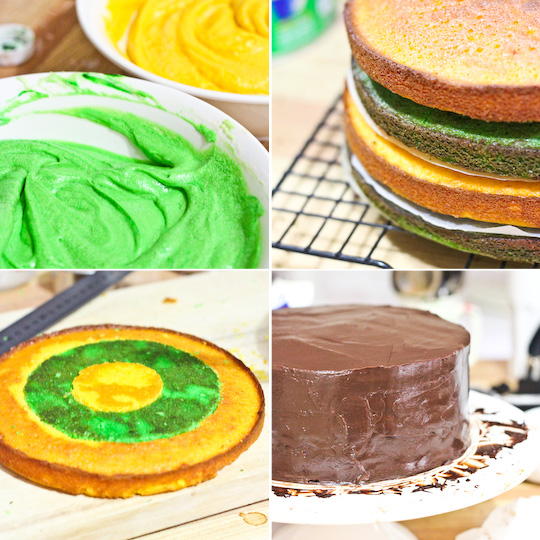
the third way, by baking cake layers in two different colours and then
cutting concentric circles out of the layers and then swapping the
middle circle of the two colours so that they alternated. (It's a
mouthful to explain in words but if you look at the picture in my recipe
below you should be able to get what I mean.)

As
for using the bright green and yellow colours for the cake rather than
just chocolate and vanilla, I was particularly inspired by the gorgeous
and brightly coloured Battenburg cakes that
Sprinkle Bakes made.
I thought it would be a great idea to use green and gold in the cake as
a celebratory Australia Day cake, and that idea was enough to give me
the courage to try this cake. After all, I had managed to pull off the
Purple Ombré Cake
pretty well (that cake still makes me smile from ear to ear), so I had a
pretty good feeling about this cake. Of course, there's no reason why
you can't do this cake in different colours for other occasions, you
could change the recipe from 4 layers into just 3 layers and use red,
white and blue for 4th of July celebrations in the US, or do red velvet
and vanilla for Valentine's Day. I ended up using the same trusty yellow
cake recipe from the purple cake and it didn't let me down. I even
tried my best to convert the measurements into volumes for US readers
but no guarantees I did it correctly since there's so much variation in
cup sizes and all that (and I'm still a firm believer that if you are a
baker you should invest in digital kitchen scales.
David Lebovitz agrees, you should listen to him. He has much knowledge).
To
hold the cake layers together, I made a quick white chocolate ganache
which I spread thinly between each layer. It worked just as I expected,
holding the cake together quite nicely without being too visible. I
would really recommend you don't skip this step since the cake is likely
to fall apart if you don't put some sort of icing/filling in between
each layer, especially if you manage to crack some of the circles of
cake that you have cut out. I managed to crack a few of the circles, but
the ganache and the way the circles fit snugly into each other held it
together. The only crack that caused me any trouble was the top outer
ring of yellow, which you might be able to see going a bit wonky in some
of the photos. So be extra gentle with those outer rings of cake.
Originally
I was going to cover the outside of the cake with my usual salted
butter icing recipe like I did for the sprinkles cake to give it that
stark white exterior with the colourful surprise on the inside, but I
decided I wanted something a little more Australian. I was seriously,
seriously
tempted to try something like a chocolate vegemite ganache, but I
chickened out since I'm not a huge fan of vegemite myself. Maybe next
year! So I decided to use my sexy chocolate &
Milo ganache
instead, because it's so tasty and Australians love their Milo. And who
doesn't love chocolate malt? The texture of the icing might look a
little odd in the photos because I had just taken the cake out of the
fridge and it had small beads of condensation on the surface, but I can
assure you that it's shiny, smooth, gorgeous and so addictive. So if
you're feeling up for it try this checkerboard cake for Australia day,
it's not actually too hard or complicated so long as you plan ahead. And
it's so pretty!
Green & Gold Checkerboard Cake with Chocolate Malt Ganache(makes one round 18cm 4-layer cake, yellow cake recipe adapted from Le Cordon Bleu Complete Cooking Step-by-Step)Note:
For US readers, you could also do this cake using only three layers of
red, white and blue cake. I tried my best to convert the measurements
for you!355g (approx 2 & 2/3 cups) plain flour
1 tbsp baking powder
1/2 tsp salt
225ml (about 1 cup minus 1 tbsp) milk
2 tsp pure vanilla extract
400g (approx 1 & 2/3 cups) white sugar (I used caster/superfine)
225g (approx 2 sticks) unsalted butter, softened
4 medium eggs
Green and yellow food colouring (I used Wilton gel colouring)
For the white chocolate ganache filling:200g white chocolate, chopped
200ml pouring cream (min. 35% milk fat unthickened pure cream)
For the chocolate malt ganache:Note: If you prefer a white exterior,
look here for a salted butter icing recipe that you can use instead
400g good quality dark chocolate, chopped
300ml pouring cream (min. 35% milk fat unthickened pure cream)
1/2
cup Milo powder (you can increase this to 3/4 cup if you like it more
malty, can be substituted with Ovaltine if unavailable)
Preheat
oven to 180°C (350°F) and grease whatever 18cm (7 inch) round cake tins
you have (I only had one so I had to bake each cake one after the
other and this worked fine). You can also use 20cm (8 inch) pans but the
layers will be thinner, or use the
special checkerboard cake tins
that come with the circular dividers. Line the base of tins with baking
paper and grease paper and dust tins with flour. Combine flour, baking
powder and salt in a medium bowl and set aside. Mix milk and vanilla
together in a measuring jug.
Using an electric mixer on low
speed, beat sugar and butter in a large bowl until blended. Increase
speed to high and beat for 2 mins or until pale and creamy. Reduce
speed to medium low, add eggs 1 at a time, beating well after each
addition. Alternately add flour mix and milk mixture, beginning and
ending with flour mixture (I did it by adding 1/4 of of the dry mixture
followed by 1/3 of the wet mixture at a time). Beat until smooth,
occasionaly scraping bowl with a spatula. Divide mixture evenly into 2
medium bowls (I did this by weighing the batter, it ended up being
about 700g per bowl for me). Gently fold yellow colouring into one bowl
and green colouring into another bowl until it's smooth.
Pour
HALF of each bowl of batter into the prepared tins (so you end up with
two yellow layers and two green layers) bake each layer for about 15-20
minutes or until a skewer into the centre comes out clean and the
outside is golden. Cool in tin for 5 mins and then turn out onto wire
racks to cool completely. Wrap in clingfilm and chill in the fridge for
at least 1 hour or overnight. If your cake layers are slightly domed in
the middle you may need to slice a little bit off the top of them to
make sure they are flat. If you are not using the special checkerboard
cake pans you will have to cut concentric circles out of your cake
layers as shown in the photo above. For an 18cm cake, I cut a 6cm
diameter circle out of the centre of the cake, then cut a 12cm diameter
circle out of the centre of the remaining cake by tracing my knife
around a plate of the same diameter, so you end up with one central
circle and two outer 'rings'. (Obviously if your cake layers are a
different size you will have to calculate the right diameter to cut your
circles, mathematics is fun!) Swap the middle 'ring' of a yellow cake
layer with the middle 'ring' from a green layer, and fit the cut pieces
back together as shown in the bottom left photo above. Try your best to
handle the cake pieces without cracking them, especially the outer
'rings'.
Prepare the white chocolate ganache, this will act as
the 'cement' to hold your cake layers together. Place white chocolate
pieces in a medium heatproof mixing bowl and heat your cream in a medium
saucepan to gradually bring it just to the boil. Remove from heat and
pour hot cream over the chocolate, leave to sit for 5 minutes while the
chocolate melts. Whisk gently until the mixture is smooth, then chill
until it is just below room temperature, thick but still pourable. Place
one of the prepared layers, I started with layer that had a yellow
outer ring, and spread a thin layer of white chocolate ganache over the
top, then place a layer with a green outer ring over the top of it.
Repeat with the remaining layers, so that the colours alternate. Chill
in the fridge for at least an hour.
Prepare the milo ganache;
place the finely chopped chocolate in a large mixing bowl. Gradually
heat the cream and milo powder together until it just starts to boil,
then remove from the heat and pour over the chocolate. Leave to sit for 5
minutes while the chocoltae melts. Whisk gently until the mixture is
smooth. If the mixture is quite runny you may need to chill it until it
thickens more, it should be easily spreadable but should not run
straight off the sides of your cake. If it starts to run everywhere
simply scrape it back into your mixing bowl and chill for longer. Spread
over the outside of your prepared cake, smoothing with an offset
spatula. You can achieve a smoother finish if you dip your spatula in a
cup of hot water regularly, or run it under hot water in the sink. Chill
cake for at least half an hour, serve at room temperature (I find it is
best to leave it sitting out of the fridge for at least an hour to
allow the ganache to soften nicely). Can be stored in an airtight
container in the fridge for several days.

![[Valid Atom 1.0]](valid-atom.png "Validate my Atom 1.0 feed")


Nenhum comentário:
Postar um comentário